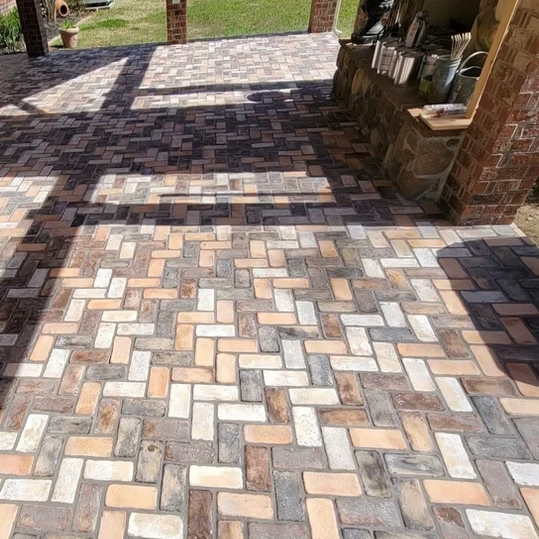
This page pertains mainly to PortStone Thin Brick installation. For information regarding Patriot Paver installations, click here, and you will be taken to our Patriot Pavers web site installation guide.
PortStone Thin Brick panels are easy to install, especially when compared to ceramic tile, or regular brick panels. A good installation job begins with floor preparation.
Clean the floor of any dust, dirt, or debris. Be sure to remove any paint from the floor as well, as this could prevent proper adhesion to the concrete. Use a crack suppressant membrane to address any cracks in the concrete subfloor. We do not recommend the use of cement or gypsum backer board underlayment when installing PortStone over a wooden subfloor. We recommend using an uncoupling membrane such as Ditra or ProvaFlex. These also work great for crack isolation over concrete slabs.
Using a chalk line, pop a few reference lines across the subfloor. These can be used as a guide in order to keep the pattern running parallel with the room.
Use a good grade of polymer-modified thin-set mortar to adhere PortStone panels to the subfloor. Then, use a ¼” X ¼” square notched trowel to spread the thin-set in accordance with the manufacturer’s instructions on the bag. Lay the PortStone panels in place. Do not apply excessive force as this will squeeze the thin-set mortar out from under the panels. Use only enough force to bring the brick panel into good contact with the thin-set mortar. Every so often, lift one of the panels to make sure that you have 100% coverage under the panels. DO NOT WALK ON THE FLOOR FOR 24 HOURS.
During installation, do not put excessive force on the corners. The material is very strong and durable once installed, but the bricks can be cracked if not handled properly. Cracked bricks can easily be cut out using a sharp utility knife to cut the mesh. Cut the cracked brick from the sheet and lay the sheet in place. Cut a good brick from another sheet to replace the ones you removed.
Allow 24 hours from the time the floor is laid before you begin grouting. You can use any type of sanded grout you would like to use provided it will withstand grout joints of ½” or more in width. We strongly suggest using our Brick and Paver Grout Mix . It is specially blended for use with PortStone and works extremely well. When grouting your floor, work in small areas to give you time to clean as you go. Take care not to pull too much grout from between the bricks.
NOTE – Do not use epoxy grout and do not use any of the All-In-One type grouts with a sealer made into the grout. These grouts stick to the surface of PortStone like very sticky paint. It makes a terrible mess and is almost impossible to remove in some cases.
PortStone can usually be sealed the day after it is grouted. Regular brick pavers generally require up to 28 days to cure before sealing. , PortStone comes pre-sealed and the final coat of sealer can usually be applied 24 hours after the grout has cured. Make sure that the grout has properly cured before sealing. Once the grout has properly cured, apply 1 coat of SC-25 Paver Seal (Gloss or Matte) using a 3/4″ nap paint roller. This is a solvent based sealer so be sure to provide adequate ventilation and extinguish all sources of ignition. When you place your order, we will determine if you need a lcertain type of sealer to be in compliance with local VOC requirements.
The sealer will dry enough to walk on usually within 2 to 3 hours. Apply two coats of our Super Wax Floor Finish or our Matte Finish with a rayon mop, lambswool applicator, or microfiber paint pad. If you are applying Matte Floor Finish, always take care to not let it puddle. Any puddles remaining after the rest of the floor has dried should be blotted up with a clean paper towel. Our floor finish dries within about 30 to 40 minutes between coats. It is ready for light foot traffic after a couple of hours.
5. When installing PortStone outside
An anti-slip additive MUST be used in the final coat of sealer When using PortStone Thin Brick outside. The surface WILL BE VERY SLICK WHEN WET if the anti-slip additive is not used. We can supply everything you need for a PortStone installation for an interior or exterior job. Our only exceptions are crack isolation membrane material and Ditra or Provaflex.
An exterior wall must be prepped according to the MCMA (Masonry Veneer Manufacturers Association) guidelines when installing PortStone out side. See the below link for more information on this process.
Ceramic tile mastic, or a thin-set mortar, can be used to adhere the PortStone panels in place. If you find you are having issues with panels sliding downward, use a drywall screw in one of the joints between the bricks to temporarily hold the panels in place. Remove the screws before grouting.
Allow the panels to remain in place overnight before grouting the wall.
There are several methods that can be used to grout in PortStone Thin Brick walls. A grout bag can be used to place the grout directly into the joints. This can require less clean-up but it can take longer to apply the grout to the joints but cleanup time is reduced. If using the grout bag method, allow sufficient time for the grout to stiffen before striking the joints with a jointing tool or small stick. Brush off any excess grout. It may be necessary to use a damp sponge to touch up the bricks.
Another method is to use a grout float or sponge to apply the grout into the joints. You can also just use your hands to work the grout into the joints. Be sure to wear good protective gloves using any of these methods. Use a damp sponge to remove excess grout and grout haze. You will likely need to wipe the wall down 2 or more times to remove all of the excess grout and haze.
The daily care and maintenance of PortStone are very easy. Dust mop or damp mop as needed. We do not recommend the use of harsh cleaners such as PineSol or vinegar and water. These will act as strippers and remove the protective floor finish coating over time. Clean water is best. If you feel the need to use a cleaner, it is best to use one that is pH neutral to prevent the removal of the floor finish. The Home Depot carries a product such as this manufactured by ZEP, very creatively named Zep pH Neutral Floor Cleaner.
We recommend that at least once a year, one or two coats of a PortStone approved floor finish be applied. This will help keep your floor looking fresh and new. Applying floor finish is a very easy process; just clean the floor thoroughly then apply the floor finish using a rayon mop, lambswool applicator, or paint pad. When choosing a mop to apply the floor finish, be sure that it is a 100% rayon mop. Do not use a cotton mop nor a cotton/rayon blend. Cotton or cotton/rayon blends will leave lint in the dried floor finish.
Be sure to put rubber tips or felt pads under all table and chair legs. PortStone holds up very well to everyday wear and tear. PortStone is very durable and long-lasting. Treat it as you would any fine floor and you should get many years of trouble-free enjoyment from it.
Be very careful when using a rug with a synthetic backing over PortStone or many other floors that are finished with an acrylic floor finish. The chemicals used in some rug backings will react with the sealer and floor finish on PortStone and other floors. They can leave a definite print of the backing imprinted into the floor’s surface. The rug can pull apart leaving bits and pieces of the backing firmly attached to the floor. In many cases, this imprint cannot be completely removed becoming a permanent part of the floor. Removing any part of is it very difficult. The only real cure is to completely remove the affected area of the floor and replace it with new PortStone material. Not all rug backings will do this, but the safest policy is to only use rugs with no backing or make sure it is a 100% natural rubber backing.
PortStone Manufacturing Corporation warrants all PortStone products to be free of manufacturer’s defects and to be manufactured according to our specifications and within color variance parameters established by PortStone Manufacturing Corporation.
All PortStone products are guaranteed against manufacturer’s defects in material and workmanship for a period of one year from the date of purchase. Any PortStone product found to be defective before installation should not be installed. Installation of any defective PortStone product shall void any and all warranties.
We do not guarantee any specific color or texture matching other than that the color and texture will be within our acceptable variance parameters.
Since PortStone Manufacturing Corporation has no control over how the product is handled or installed; or what the product may be exposed to after installation, PortStone is not warranted against chips, scratches, or cracks.
This warranty is for product replacement only. It specifically excludes any and all labor expenses or any other expense related to the product replacement.
PortStone Manufacturing Corporation has no ownership interest in any independent distributor, contractor, or installer. No independent dealer, distributor, contractor, nor installer has authority to modify this warranty in any way. Any guarantee made by an independent dealer, distributor, contractor, or installer as mentioned above is the responsibility of that person or company. It is made separate from this warranty. They shall not alter this warranty in any way.
This warranty covers the original purchaser and anyone who takes possession of the home or building where the product is originally installed during the warranty period.
This warranty provides specific rights. You may have other rights which vary by location.
When properly installed and maintained according to our recommendations and specifications, and with the care and treatment that you would give any fine flooring material, your PortStone floor should give you many years of beauty, serviceability, and enjoyment. Check our website, www.portstone.com, or give us a call at 601-922-0902 for any questions you may have.